Manually Registering a SharePoint Add-In
After writing the Modern Development Lifecycle article I came to the realization that the article I mentioned for creating the client id and secret missed an important step. It missed how to create the application itself. So in this article we are going to create and permission an add-in so it is ready for our use.
Register our Add-In
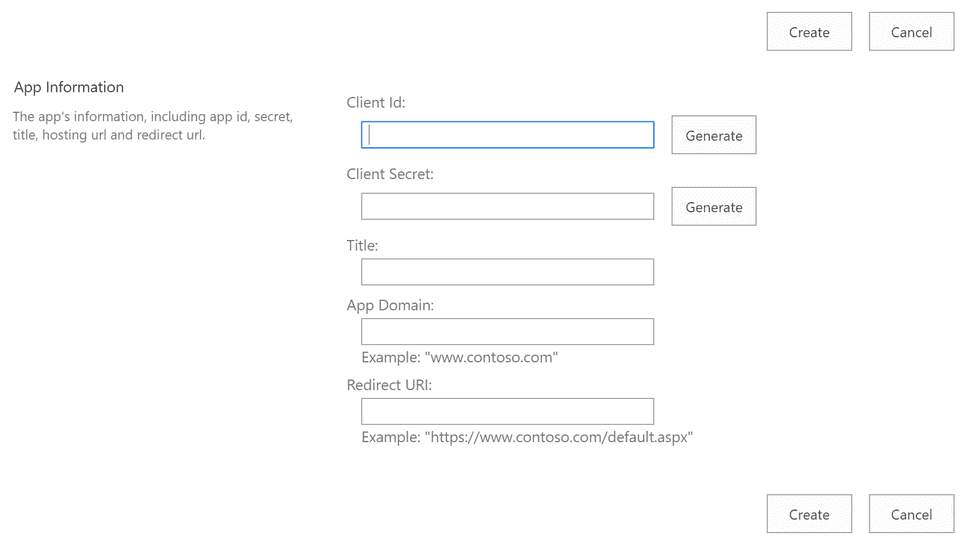
The first step in our journey is to register our add-in with SharePoint this is done by going to the following URL in the site where our add-in will be communicating and performing work, https://sharepoint/site/_layouts/15/appregnew.aspx You will get a screen like this.
Firstly, we need to setup a Client Id and Secret, we can either have SharePoint generate these for us or we can enter existing values that we have. For the title, we need something that will make sense for us if we need to look up the add-in later. If we are performing updates through server side code, then it doesn’t matter what we put in the App Domain and the Redirect URI. The redirect URI just needs to be a valid URI. Make sure you note the Client Id and Secret, we will need them for our code to work. If you lose the secret, there is no way that I am aware of to recover it. Now we can click create. We will now be presented with a confirmation screen that will show the information we entered, now would be a good time to copy your Client Id and Secret if you haven’t yet. Next, we need to grant our Add-In permissions to do things.
Grant permissions to your Add-In
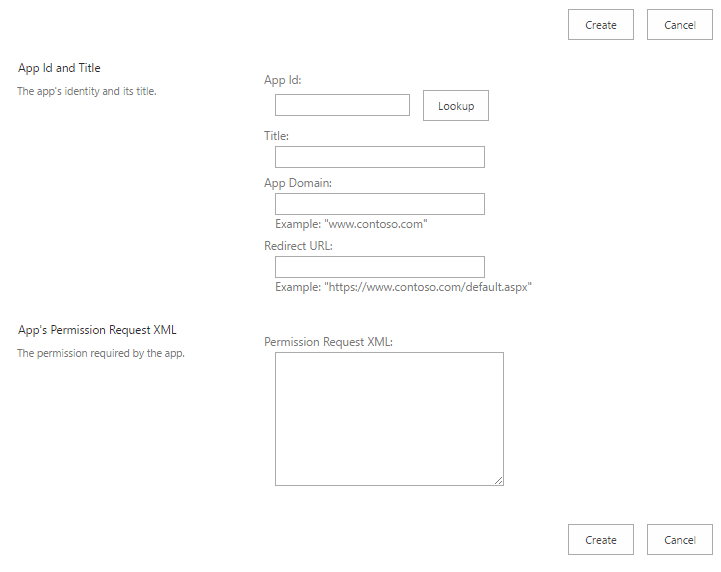
Now we need to make it so our Add-in has the needed permissions to perform what we intend it to do. To do this we need to go to https://sharepoint/site/_layouts/15/appinv.aspx. Make sure you are accessing this in the same site that registered the add-in under. You should get a screen like the following.
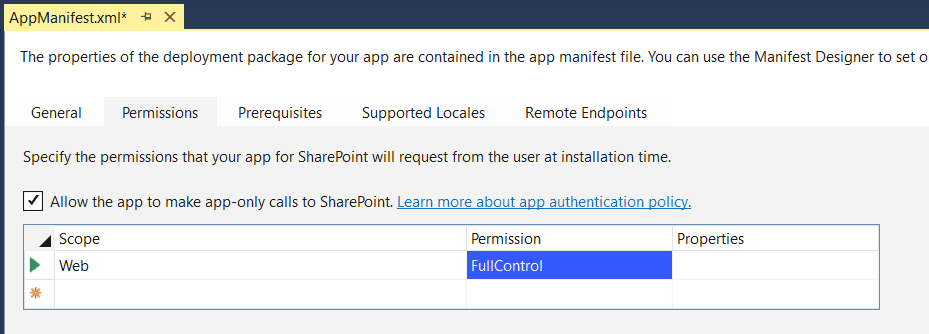
Enter your Client Id from the previous step in the App Id box and click “Lookup”. This should pull in the rest of the information from what we entered previously except for the “App’s Permission” XML part. This is where we need to create the XML that lists the permissions that our Add-In will need. I have found the easiest way to generate this when you are starting out is to create a SharePoint Add-In in Visual Studio and then copy the XML value that is generated into the box. To do that create a new SharePoint Add-In in Visual Studio, or reuse an existing one (my favorite approach). Once the project has loaded, open the solution explorer and then open the AppManifest.xml designer by double clicking on the AppManifest.xml file. Now click on the Permissions tab. Select the permission area that you want from the scope drop down and then select the permission level from the permission drop down. Now save your changes. Keep in mind whatever permissions you are requesting you need to have those permissions as well. You cannot grant an Add-In permission, that you do not already have. Also, sadly there is no way to grant permission to multiple lists. If you need to work with multiple lists you will need to define a Web scope permission.
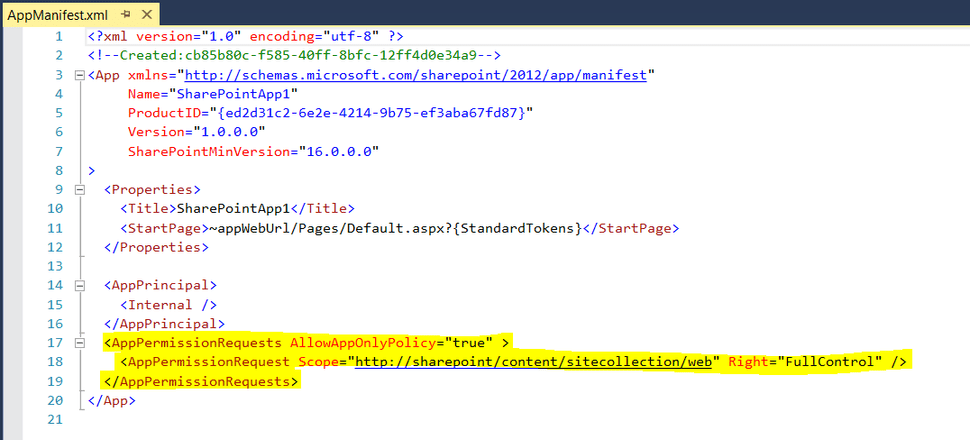
Once you have saved the file open the solution explorer again and right click the AppManifest.xml file and select view code. If you get a prompt about already having the file open and do you want to close it, click Yes. We are now presented with the raw XML for our dummy Add-In. If we look at the bottom of the XML there is a section called AppPermissionRequests. We need to copy this whole thing and paste it in the Request XML box in our browser.
I am including a sample of what Full Control for a Web would be but keep in mind that sometimes the browsers and blogging tools corrupt the quotes. So, if you get an error check that the string matches what you see here.
<AppPermissionRequests AllowAppOnlyPolicy="true" \>
<AppPermissionRequest Scope="http://sharepoint/content/sitecollection/web"
Right="FullControl" /\>
</AppPermissionRequests\>
Once we put this value into the Permission Request XML box we are good to click create. Once you do so SharePoint will give a you a prompt to confirm the permissions that you want to grant. This is the part where you need the permissions that you are granting. You should get a confirmation screen, if you do you are ready to start using your Client Id and Secret to start working with SharePoint with your Add-Ins permissions instead of your accounts permissions, Enjoy! If you get an error, you will need to resolve whatever issues you are seeing.


